Acceleration is when something changes speed. It usually refers to when something speeds up, but it can also be used for slowing down. In this case, we're using the former. While I was making my latest project (see "
The Enterprise"), I realized that in order to make it look realistic it needed to accelerate to maximum speed. I was modeling it after an actual ride, and the ride doesn't just start at it's maximum speed, it slowly climbs up to it. I knew there aren't any "acceleration blocks", so I needed to find another way of doing it. The first thing I did was click on the
Robot Educator in the upper right-hand corner of programming program (that's arguably the best thing to do when you need help), go to
motor, then to
Accelerate. That's where I found my first method of accelerating...
First Method
Set up a few move blocks, each one with a higher speed than the last.
Pros: Very simple, easy way of accelerating
Cons: Was a bit
too simple; I calculated I'd need about 50 blocks in order to achieve the look I was going for. Moving on to the second method...
Second Method
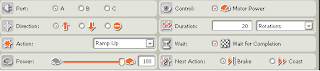 |
| Ramping up |
Use the "ramp up" setting on the motor block. If you don't already know this, there is a "ramp up" and "ramp down" setting on the motor block. What it does is allows you to reach a certain speed in a certain amount of time. In the picture on the right, the ramp up setting allows me to reach 100 power in 20 rotations.
Pros: Lets you be very specific, and is way easier to use than setting up 50 blocks (as in the first method).
Cons: After experimenting with it for an hour, I still couldn't get it to look right. I did end up using it for slowing down though, being that the third method doesn't work for slowing down.
Third Method
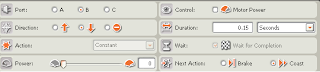
I used a loop and had the speed of the motor equal the number of times the loop was completed using a number data wire. I also set a limit, so once the loop was completed 101 times, the speed would equal 100 and the loop would end, moving on to the next block which moves it at a constant speed (the reason the loop needed to be completed 101 times is that the first time the loop goes around, the times completed equals 0. So the first time the loop goes around, the motor doesn't move at all. Therefore, I needed to add an extra loop). See picture of loop and information on right.
Pros: Looked
almost perfect. It fit my needs.
 Cons:
Cons: It was hard to figure out how many seconds each loop should take. I decided on 0.15, because 0.15 x 101 = 15.15, which is approximately how long the actual ride I was modeling it after took.
Well, there's the methods I found for accelerating. So far I haven't been able to think of any more... Have you ever used acceleration with your NXT? I would love to hear about the method you used.


 Cons: It was hard to figure out how many seconds each loop should take. I decided on 0.15, because 0.15 x 101 = 15.15, which is approximately how long the actual ride I was modeling it after took.
No comments:
Post a Comment
Your comment will be moderated as soon as possible. Thank you!